Wednesday, December 26, 2012

Core Data Part 2: Update, Delete Managed Objects and View Raw SQL Statement

http://www.appcoda.com/core-data-tutorial-update-delete/

This is the second article for our Core Data series. Previously, we gave you a brief introduction of Core Data and created a simple app to store all your device information. However, we only showed you how to insert records into data store through Core Data API and left out the update & delete operations.
In this tutorial, we’ll continue to work on the app and focus on the following areas of Core Data:
  • Updating or deleting an object using Core Data API
  • Viewing the raw SQL statement for debugging purpose

Updating or Delete an Object using Core Data

Note: If this is the first time you learn about Core Data, we recommend you to read the first tutorial. But for those who do not want to start from the very beginning, you can download this Xcode project to continue to work on the below tutorial.
In the last tutorial, we already discussed how to fetch and save a managed object using Core Data API. So how can you update or delete an existing managed object from database?

Deleting an Object

Let’s talk about the delete operation first. To allow user to delete a record from the table view, as you know, we can simply implement the “canEditRowAtIndexPath” and “commitEditingStyle” methods. Add the following code to the DeviceViewController.m:
1
2
3
4
5
6
7
8
9
10
11
12
13
14
15
16
17
18
19
20
21
22
23
24
25
26
- (BOOL)tableView:(UITableView *)tableView canEditRowAtIndexPath:(NSIndexPath *)indexPath
{
    // Return NO if you do not want the specified item to be editable.
    return YES;
}


- (void)tableView:(UITableView *)tableView commitEditingStyle:(UITableViewCellEditingStyle)editingStyle forRowAtIndexPath:(NSIndexPath *)indexPath
{
    NSManagedObjectContext *context = [self managedObjectContext];

    if (editingStyle == UITableViewCellEditingStyleDelete) {
        // Delete object from database
        [context deleteObject:[self.devices objectAtIndex:indexPath.row]];
       
        NSError *error = nil;
        if (![context save:&error]) {
            NSLog(@"Can't Delete! %@ %@", error, [error localizedDescription]);
            return;
        }
       
        // Remove device from table view
        [self.devices removeObjectAtIndex:indexPath.row];
        [self.tableView deleteRowsAtIndexPaths:[NSArray arrayWithObject:indexPath] withRowAnimation:UITableViewRowAnimationFade];
    }
}
We’ll not go into the details about how to remove a row from table view as we’ve already covered in our earlier tutorial. Let’s focus on the code of commitEditingStyle method for deleting the managed object from database.
Like saving data, we first grab the manage object context. The context provides a method called “deleteObject” that allows you to delete the specific object from database. Lastly, we invoke the “save” method to commit the change. Following the removal of the object from database, we also remove the record from the table view.
Now, let’s run the app and try to remove a record from database. Your app should look similar to the following:
Delete a device from database

Updating an Object

Next, we’ll enhance the app to let user update the device information. Go to the Storyboard and add a new segue for the table cell. This segue is used to connect a table cell and the detail view controller. When user selects any device in the table view, the detail view controller will be displayed to show the information of the selected device.
MyStore - Add UpdateDevice Segue
Add a new segue for updating device
To differentiate the segue from the one for adding a new device, we set an identifier as “UpdateDevice”. Next, add the prepareForSegue method in DeviceViewController.m:
1
2
3
4
5
6
7
8
- (void)prepareForSegue:(UIStoryboardSegue *)segue sender:(id)sender
{
    if ([[segue identifier] isEqualToString:@"UpdateDevice"]) {
        NSManagedObject *selectedDevice = [self.devices objectAtIndex:[[self.tableView indexPathForSelectedRow] row]];
        DeviceDetailViewController *destViewController = segue.destinationViewController;
        destViewController.device = selectedDevice;
    }
}
When user selects a specific device in the table view, it’ll go through the “UpdateDevice” segue. We then retrieve the selected device and pass it to the detail view controller.
Note: If you have no idea about what the segue is, go back to check out the tutorial about passing data between view controllers with segue.
Next, add a new properties in the DeviceDetailViewController.h for saving the selected device:
1
@property (strong) NSManagedObject *device;
As always, add the synthesis statement in the DeviceDetailViewController.m:
1
2
@implementation DeviceDetailViewController
@synthesize device;
To display the information of the selected device, we have to change the “viewDidLoad” method:
1
2
3
4
5
6
7
8
9
10
11
- (void)viewDidLoad
{
    [super viewDidLoad];
    // Do any additional setup after loading the view.
    if (self.device) {
        [self.nameTextField setText:[self.device valueForKey:@"name"]];
        [self.versionTextField setText:[self.device valueForKey:@"version"]];
        [self.companyTextField setText:[self.device valueForKey:@"company"]];
    }

}
Let’s stop here and try to run the app again. As your app launches, tap any of the device records and the device information should appear in the detail view.
MyStore - Display Detail Device Info
Display Detailed Device Information
However, the app is not finished yet. If you try to edit the information of an existing device, it will not update the device information properly. Go back to the DeviceDetailViewController.m and modify the “save:” method:
1
2
3
4
5
6
7
8
9
10
11
12
13
14
15
16
17
18
19
20
21
22
23
24
25
- (IBAction)save:(id)sender {
    NSManagedObjectContext *context = [self managedObjectContext];
   
    if (self.device) {
        // Update existing device
        [self.device setValue:self.nameTextField.text forKey:@"name"];
        [self.device setValue:self.versionTextField.text forKey:@"version"];
        [self.device setValue:self.companyTextField.text forKey:@"company"];

    } else {
        // Create a new device
        NSManagedObject *newDevice = [NSEntityDescription insertNewObjectForEntityForName:@"Device" inManagedObjectContext:context];
        [newDevice setValue:self.nameTextField.text forKey:@"name"];
        [newDevice setValue:self.versionTextField.text forKey:@"version"];
        [newDevice setValue:self.companyTextField.text forKey:@"company"];
    }
   
    NSError *error = nil;
    // Save the object to persistent store
    if (![context save:&error]) {
        NSLog(@"Can't Save! %@ %@", error, [error localizedDescription]);
    }
   
    [self dismissViewControllerAnimated:YES completion:nil];
}
We’ll update the device information if any of the devices is selected. If there is no selected device, we’ll then create a new device and add it into the database.
Try to test the app again. The update feature should now work properly:
MyStore - Update Device Info Sample
Now you can update the device info properly!

Viewing the Raw SQL Statement

Thanks to Core Data. Even without learning SQL and database, you’re able to perform create, select, update and delete operation. However, for those with database background, you may want to know the exact SQLs executed behind the scene.
To enable SQL output for debugging purpose, click “MyStore” and select “Edit Scheme”.
Xcode Edit Scheme
Edit scheme in Xcode project
Under “Argument Passed on Launch” section, click the “+” button and add the “-com.apple.CoreData.SQLDebug 1″ parameter:
Xcode add SQL Debug Parameter
Add SQL Debug Parameter
Click “OK” to confirm. Now run your app again and you’ll see the raw SQL statement (e.g. SELECT and UPDATE) displayed in the output window.
Sql statement output debug
SQL statement for Core Data Debugging

What’s Coming Next

We hope you enjoy the tutorial and have a better understanding about Core Data. For your reference, you can download the complete source code here.
In the later tutorials, we’ll talk about object relationship and show you how to optimize the app using NSFetchedResultsController.

Introduction to Core Data: Your First Step to Persistent Data

http://www.appcoda.com/introduction-to-core-data/

Editor’s note: After we published the tutorial about saving data in plist file, some readers asked about Core Data and how we can use it to save persistent information. This week, we work with Ziad Tamim, an independent iOS developer, to give you an introduction of Core Data and work with you to build a sample app using Core Data.
This tutorial talks about persistence on iPhone (or other iOS devices). What I mean by persistence is to make data that’s in your apps stay around between application launches. Persistence lets users store persistent data and also retrieve it, so that users don’t have to reenter all their data each time they use their applications. There are multiple ways to store data in iOS devices but most of them aren’t good enough to store a complicated data. They are usually used to save settings or to preload some data such as “Property List” and “Archiving Objects”. So that’s why we’ll go through Core Data to see how you can utilize it to manage data in database.
The focus of the tutorial is to provide a practical introduction of Core Data framework. I expect you’ve already gone through our tutorials about Storyboard and UITableView. I will not give in-depth explanation about how to create view controller in Storyboard but you can always refer to the earlier tutorials to gain better understanding.

Core Data is not a Database

When we talk about persistent data, people probably think of database. If you are familiar with Oracle or MySQL, you know that relational database stores data in the form of table, row and column, and it usually facilitates access through what-so-called SQL query. However, don’t mix up Core Data with database. Though SQLite database is the default persistent store for Core Data on iPhone, Core Data is not a relational database. It is actually a framework that lets developers store (or retrieve) data in database in an object-oriented way. With Core Data, you can easily map the objects in your apps to the table records in the database without even knowing any SQL.
To illustrate the concept, let’s begin and create your first app using Core Data. This app is called My Store. It is a very simple app that stores all devices you have by collecting the name, version, company.
MyStore App using Core Data

Creating a Sample App with Core Data

First let’s create a project with Core Data. Open Xcode and create a new Project, choose the template Empty Application as shown below.
Create a New Project with Empty Application Template
At the next screen, enter MyStore as a name of the project, select iPhone in Devices family and don’t forget to select the options Use Storyboards, Use Core Data, Use Automatic Reference Counting. Press next and create.
MyStore Xcode Project Options
Set up Xcode Project Options – Remember to select Use Core Data

Core Data Stack

Before we start working on the project, you first have to understand the Core Data Stack:
Managed Object Model – It describes the schema that you use in the app. If you have a database background, think of this as the database schema. However, the schema is represented by a collection of objects (also known as entities). In Xcode, the Managed Object Model is defined in a file with the extension .xcdatamodeld. You can use the visual editor to define the entities and their attributes, as well as, relationships.
Persistent Store Coordinator – SQLite is the default persistent store in iOS. However, Core Data allows developers to setup multiple stores containing different entities. The Persistent Store Coordinator is the party responsible to manage different persistent object stores and save the objects to the stores. Forget about it you don’t understand what it is. You’ll not interact with Persistent Store Coordinator directly when using Core Data.
Managed Object Context – Think of it as a “scratch pad” containing objects that interacts with data in persistent store. Its job is to manage objects created and returned using Core Data. Among the components in the Core Data Stack, the Managed Object Context is the one you’ll work with for most of the time. In general, whenever you need to fetch and save objects in persistent store, the context is the first component you’ll talk to.
The below illustration can probably give you a better idea about the Core Data Stack:
Core Data Stack
Core Data Stack

Defining Managed Object Model

Let’s move on to build the app. The first step is to open the Data Model named MyStore.xcdatamodeld and define the object model. Here we’ll define a Device entity that will be used to store the device information to database. To create an entity, click the + button in the bottom-left of the editor view and name the entity as Device.
Managed Object Model - Add Entity
Add Device entity in the model
Once you create a new entity, you need to add attributes to it. Click on the + button in the attributes section to do that. Add three attributes including name, version and company. Set the type as String.
MyStore Add Entity
Add 3 Attributes (company, name and version) to the Device entity

Designing the User Interface

Note: While we encourage you to build the user interface, you can also skip the procedures and download the project template from here. The template already comes with the Storyboard and set up all the view controller classes for you. This gives you a good starting point to work on Core Data. If you use the template, you can skip this section and go directly to the “Diving Core Data” section.
The next thing we need to do is to create the Storyboard that defines the views of our app. Navigate to File > New > New File and choose Storyboard in the User Interface template. Click next and select the iPhone device family, click create.
Creating the Storyboard
Once created, make sure to set the “Storyboard” you’ve just created as the main storyboard in the project setting.
MyStore Set Main Storyboard
Set the Storyboard you just created as the Main Storyboard
Also don’t forget to delete all the generated code in the method -(BOOL)application:application didFinishLaunchingWithOptions:launchOptions inside the AppDelegate file. The method should be as simple as this:
1
2
3
4
- (BOOL)application:(UIApplication *)application didFinishLaunchingWithOptions:(NSDictionary *)launchOptions
{
    return YES;
}
Go to Storyboard and create the user interface like below:
MyStore - Storyboard
MyStore App – Storyboard
First, drag a Table View Controller and embed it in a Navigation Controller. Drag a button to the top-right part of navigation bar and set the identifier as “Add”. This will automatically change the button to a “+” button. Next, select the prototype cell and change its style to “Right Detail”.
MyStore App - Table View Controller
Creating the Table View Controller
Drag a View Controller to the Storyboard and add a Navigation Bar to the top of the screen. Next, drag two buttons into the navigation bar. Name one as “Cancel” and the other one as “Save”. In the content view, add three text fields and name the placeholder attributes as “Name”, “Version” and “Company”.
This detail view will be shown when user taps the “+” button in the table view controller. So finally, press and hold the Control key, click the “+” button and drag towards the detail view controller. Select “Modal” as the Segue action to connect the table view controller and detail view controller.
MyStore App - Detail View Design
Designing the Detail View Controller

Creating View Controller Classes

Create a new class by right-clicking on the MyStore folder > New File > Objective-C class, and name the class as DeviceViewController. Make it as a subclass of UITableViewController. Navigate to the Storyboard, select the Table View Controller and associate it with the DeviceViewController class.
MyStore - Assign DeviceViewController Class
Set the Custom Class as DeviceViewController
Once done, do the same steps to create a new class named DeviceDetailViewControllerUIViewController. Again, go to Storyboard and set the custom class of the detail view controller as the “DeviceDetailViewController”.
Lastly, wire up the UITextFields to the DeviceDetailViewController header file and create two action methods for the save and cancel buttons respectively.
MyStore - Wire up Text Field
Creating IBOutlet and Action Methods
Your code should like this:
1
2
3
4
5
6
@property (weak, nonatomic) IBOutlet UITextField *nameTextField;
@property (weak, nonatomic) IBOutlet UITextField *versionTextField;
@property (weak, nonatomic) IBOutlet UITextField *companyTextField;

- (IBAction)cancel:(id)sender;
- (IBAction)save:(id)sender;

Diving into Core Data

With the user interface, it’s time to go into the details of Core Data. Apparently, there are a couple of areas we have to implement:
  1. Save device information in the Detail View Controller
  2. Fetch device information from persistent store (i.e. SQLite database) and populate the data into Table View Controller
We’ll look into the implementation one by one.

Saving Device Information

First, we need to implement the DeviceDetailViewController to let user add the devices to the database. Open up the DeviceDetailViewController.m file and add the following code after @implementation DeviceDetailViewController:
1
2
3
4
5
6
7
8
- (NSManagedObjectContext *)managedObjectContext {
    NSManagedObjectContext *context = nil;
    id delegate = [[UIApplication sharedApplication] delegate];
    if ([delegate performSelector:@selector(managedObjectContext)]) {
        context = [delegate managedObjectContext];
    }
    return context;
}
Recalled that we’ve selected the Core Data option when creating the project, Xcode automatically defines a managed object context in AppDelegate. This method allows us to retrieve the managed object context from the AppDelegate. Later we’ll use the context to save the device data.
Next, we’ll implement the “save” and “cancel”, add the necessary code to look like this:
1
2
3
4
5
6
7
8
9
10
11
12
13
14
15
16
17
18
19
20
21
- (IBAction)cancel:(id)sender {
    [self dismissViewControllerAnimated:YES completion:nil];
}

- (IBAction)save:(id)sender {
    NSManagedObjectContext *context = [self managedObjectContext];
   
    // Create a new managed object
    NSManagedObject *newDevice = [NSEntityDescription insertNewObjectForEntityForName:@"Device" inManagedObjectContext:context];
    [newDevice setValue:self.nameTextField.text forKey:@"name"];
    [newDevice setValue:self.versionTextField.text forKey:@"version"];
    [newDevice setValue:self.companyTextField.text forKey:@"company"];
   
    NSError *error = nil;
    // Save the object to persistent store
    if (![context save:&error]) {
        NSLog(@"Can't Save! %@ %@", error, [error localizedDescription]);
    }
   
    [self dismissViewControllerAnimated:YES completion:nil];
}
When user taps the “Cancel” button, we expect the app to close the detail view controller. Line 2 of the above code invokes the dismissViewControllerAnimated method to dismiss the current view controller with animation.
For the “save” method, we first grab the managed object context. Every object that Core Data stores is inherited from NSManagedObject. So we first create a new instance of NSManagedObject for the “Device” entity that we’ve defined in the object model. NSEntityDescription class provides a method named “insertNewObjectForEntityForName” for developer to create a managed object. Once you created the managed object (i.e. newDevice), you can set the attributes (name, version, company) using the user input. Lastly, we call up the “save:” method of the context to save the object into database.
You can now hit the Run button to try out your app. Tap the “+” button to bring up the Detail View and save a new device. However, the new device is not yet displayed in the table. Let’s move on to see how you can fetch the device information from database.

Fetching Device Information

Open DeviceViewController.m, add a “devices” property to it so we can save all the devices received.
1
2
3
4
@interface DeviceViewController ()
@property (strong) NSMutableArray *devices;

@end
Again, add the following code after “@implementation DeviceViewController” for grabbing the managed object context:
1
2
3
4
5
6
7
8
9
- (NSManagedObjectContext *)managedObjectContext
{
    NSManagedObjectContext *context = nil;
    id delegate = [[UIApplication sharedApplication] delegate];
    if ([delegate performSelector:@selector(managedObjectContext)]) {
        context = [delegate managedObjectContext];
    }
    return context;
}
Next, add a viewDidAppear method:
1
2
3
4
5
6
7
8
9
10
11
- (void)viewDidAppear:(BOOL)animated
{
    [super viewDidAppear:animated];
   
    // Fetch the devices from persistent data store
    NSManagedObjectContext *managedObjectContext = [self managedObjectContext];
    NSFetchRequest *fetchRequest = [[NSFetchRequest alloc] initWithEntityName:@"Device"];
    self.devices = [[managedObjectContext executeFetchRequest:fetchRequest error:nil] mutableCopy];
   
    [self.tableView reloadData];
}
Like what we’ve done in the Detail View Controller, we first grab the managed object context. To fetch device information from database, the code above creates a new instance of NSFetchRequest and set the entity Device and invokes “executeFetchRequest” method to retrieve all the devices from the database. If you are familiar with relational databases, this instance works like the SELECT clause.
Note:
If you’re new to viewDidAppear method, it is a method that will be called automatically every time a view is displayed. It’s unlike the viewDidLoad method that is invoked once when the controller is loaded.

Populating Device Information into Table View

As we would like to display these data into the table view we need to implement the data source of it, to do that add the below code:
1
2
3
4
5
6
7
8
9
10
11
12
13
14
15
16
17
18
19
20
21
22
23
24
- (NSInteger)numberOfSectionsInTableView:(UITableView *)tableView
{
    // Return the number of sections.
    return 1;
}

- (NSInteger)tableView:(UITableView *)tableView numberOfRowsInSection:(NSInteger)section
{
    // Return the number of rows in the section.
    return self.devices.count;
}

- (UITableViewCell *)tableView:(UITableView *)tableView cellForRowAtIndexPath:(NSIndexPath *)indexPath
{
    static NSString *CellIdentifier = @"Cell";
    UITableViewCell *cell = [tableView dequeueReusableCellWithIdentifier:CellIdentifier forIndexPath:indexPath];
   
    // Configure the cell...
    NSManagedObject *device = [self.devices objectAtIndex:indexPath.row];
    [cell.textLabel setText:[NSString stringWithFormat:@"%@ %@", [device valueForKey:@"name"], [device valueForKey:@"version"]]];
    [cell.detailTextLabel setText:[device valueForKey:@"company"]];
   
    return cell;
}
If you have used UITableViewController before, the code above is the simple way to display data into the table view. If you check the code you will notice the NSMangedObject is pretty much like NSDictionary. It gathers all the attributes of the entity (i.e. Device) and you can simply use the “valueForKey” method to grab the attribute value.
Note: If you’re new to UITableView, you can check out the earlier tutorials about UITableView.
That’s it. Let’s try to run the app and test it. If everything is okay, your app should like this. Try to add some devices and the device information should be populated automatically in the table view.
MyStore App using Core Data

What’s Coming Next

It’s a lengthy tutorial but we try to elaborate the implementation as detail as possible so everyone can follow. As you can see, with Core Data, you don’t have to care about SQL to save and retrieve data from database. Everything is done behind the scene. This tutorial kicks off the first part of Core Data series. Later we’ll talk more about object relationship and
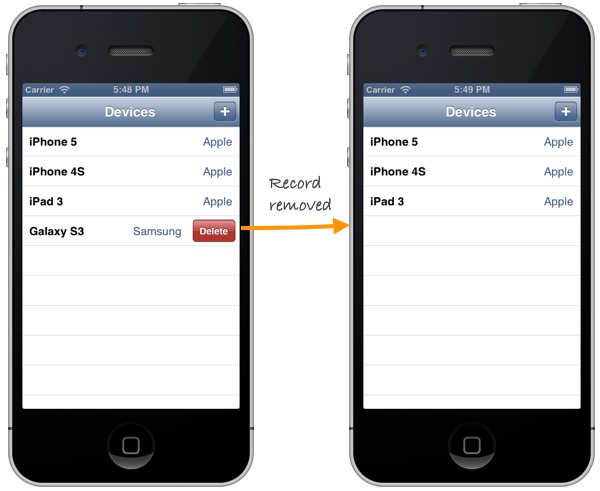
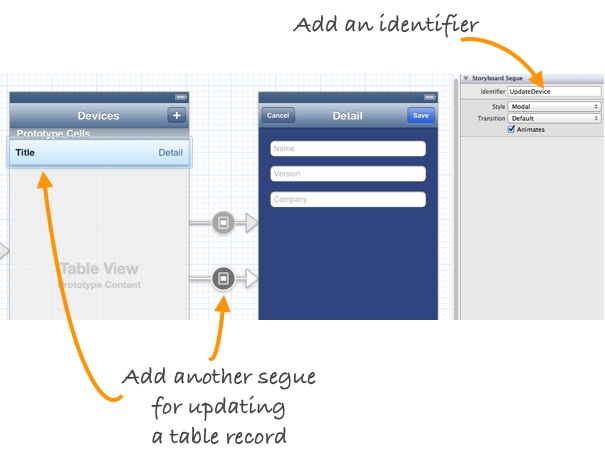
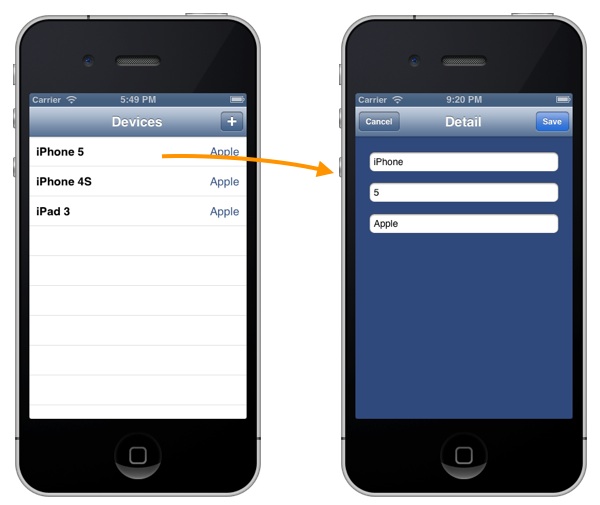
Lastly, let me end the tutorial with an exercise. Try to complete the app by adding the functions that let user update and delete an existing device by selecting a row in the table view.
Hope you enjoy the tutorial and feel to leave us comment.
Update: Check out part 2 of the Core Data tutorial series!

Tuesday, December 25, 2012

Enhance Your Simple Table App With Property List

http://www.appcoda.com/enhance-your-simple-table-app-with-property-list/

Here comes another weekly tutorial for iOS programming. We already built a very simple table app displaying list of recipes. If you look into the app, all our recipes are specified in the source code. I try to keep the thing simple and focus on showing how to create a UITableView. However, it’s not a good practice to “hard code” every item in the code. In real app, we used to externalized these static items (i.e. the recipe information) and put them in a file or database or somewhere else. In iOS programming, there is a type of file called Property List. This kind of file is commonly found in Mac OS and iOS, and is used for storing simple structured data (e.g. application setting). In this tutorial, we’ll make some changes in our simple table app and tweak it to use Property List.
In brief, here are a couple of stuffs we’ll cover:
  • Convert table data from static array to property list
  • How to read property list

Why Externalize the Table Data?

It’s a good practice to separate static data from the code. But why? What’s the advantage to put the table data into an external source. Let’s ask you to add 50 more recipes in our simple table app. Probably, you’ll go back to your code and put all the new recipes in the initialization:
1
2
3
4
5
6
7
8
    // Initialize table data
    tableData = [NSArray arrayWithObjects:@"Egg Benedict", @"Mushroom Risotto", @"Full Breakfast", @"Hamburger", @"Ham and Egg Sandwich", @"Creme Brelee", @"White Chocolate Donut", @"Starbucks Coffee", @"Vegetable Curry", @"Instant Noodle with Egg", @"Noodle with BBQ Pork", @"Japanese Noodle with Pork", @"Green Tea", @"Thai Shrimp Cake", @"Angry Birds Cake", @"Ham and Cheese Panini", nil];
   
    // Initialize thumbnails
    thumbnails = [NSArray arrayWithObjects:@"egg_benedict.jpg", @"mushroom_risotto.jpg", @"full_breakfast.jpg", @"hamburger.jpg", @"ham_and_egg_sandwich.jpg", @"creme_brelee.jpg", @"white_chocolate_donut.jpg", @"starbucks_coffee.jpg", @"vegetable_curry.jpg", @"instant_noodle_with_egg.jpg", @"noodle_with_bbq_pork.jpg", @"japanese_noodle_with_pork.jpg", @"green_tea.jpg", @"thai_shrimp_cake.jpg", @"angry_birds_cake.jpg", @"ham_and_cheese_panini.jpg", nil];
   
    // Initialize Preparation Time
    prepTime = [NSArray arrayWithObjects:@"30 min", @"30 min", @"20 min", @"30 min", @"10 min", @"1 hour", @"45 min", @"5 min", @"30 min", @"8 min", @"20 min", @"20 min", @"5 min", @"1.5 hour", @"4 hours", @"10 min", nil];
There is nothing wrong doing this. But look at the code! It’s not easy to edit and you have to strictly follow the Objective C syntax. Changing the code may accidentally introduce other errors. That’s not we want. Apparently, it would be better to separate the data and the programming logic (i.e. the code). Does it look better when the table data is stored like this?
Sample Property List
In reality, you may not be the one who provides the table data (here, the recipe information). The information may be given by others without iOS programming experience. When we put the data in an external file, it’s easier to read/edit and more understandable.
As you progress, you’ll learn how to put the data in server side (or what-so-called the Cloud). All data in your app are pulled from the server side on demand. It offers one big benefit. For now, any change of the data will require you to build the app and submit it for Apple’s approval. By separating the data and put them in the Cloud, you can change the data anytime without updating your app.
We’re not going to talk about the Cloud for today. Let’s go back to the basic and see how you can put all the recipes in a Property List.

What is Property List

Property list offers a convenient way to store simple structural data. It usually appears in XML format. If you’ve edited some configuration files in Mac or iPhone before, you may come across files with .plist extension. They are examples of the Property List.
You can’t use property list to save all types of data. The items of data in a property list are of a limited number of types including “array”, “dictionary”, “string”, etc. For details of the supported types, you can refer to the Property List documentation.
Property list is commonly used in iOS app for saving application settings. It doesn’t mean you can’t use it for other purposes. But it is designed for storing small amount of data.

Is it the Best Way to Store Table Data?

No, definitely not. We use property list to demonstrate how to store table data in an external file. It’s just an example. As you gain more experience, you’ll learn other ways to store the data.

Convert Table Data to Property List

That’s enough for the background. Let’s get our hands dirty and convert the data into a property list. First, open the Simple Table project in Xcode. Right click on the “SimpleTable” folder and select “New File…”. Select “Other” under “iOS” template, choose “Property List” and click “Next” to continue.
Xcode New Property List File
Create a New Property List File
When prompted, use “recipes” as the file name. Once you confirm, Xcode will create the property list file for you. By default, the property list is empty.
Xcode Recipe Plist
Empty Property List
There are two ways to edit the property list. You can right-click on the editing area and select “Add Row” to add a new value.
Xcode Property List Add Row
Add a New Row in Property List Editor
As we’re going to put the three data arrays in the property list, we’ll add three rows with “array” type. Name them with the keys: RecipeName, Thumbnail and PrepTime. The key serves as an identifier and later you’ll use it in your code to pick the corresponding array.
SimpleTableApp Property List Array
Define Three Arrays in Property List
To add data in the array, just expand it and click the “+” icon to add a new item. Follow the steps in the below illustration if you don’t know how to do it.
Add Property in Property List
Step by Step Procedures to Add an Item in Array
Repeat the procedures until you add all the values for the array. Your property list should look like this:
SimpleTableApp Recipe Property List
Recipe Property List
For your convenience, you may download the recipes.plist and add it to your project.
As mentioned earlier, the property list is usually saved in the format of XML. To view the source of the property list, right click and select “Open as Source Code”.
Open Property List as Source Code
View the Source Code of Property List
The source code of “recipes.plist” file will appear like this:
Property List Source Code
Source Code of Recipes.plist

Loading Property List in Objective C

Next, we’ll change our code and load the recipe from the property list we just built. It’s fairly easy to read the content of property list. The iOS SDK already comes with some built-in functions to handle the read/write of the file.
Replace the following code:
1
2
3
4
5
6
7
8
// Initialize table data
    tableData = [NSArray arrayWithObjects:@"Egg Benedict", @"Mushroom Risotto", @"Full Breakfast", @"Hamburger", @"Ham and Egg Sandwich", @"Creme Brelee", @"White Chocolate Donut", @"Starbucks Coffee", @"Vegetable Curry", @"Instant Noodle with Egg", @"Noodle with BBQ Pork", @"Japanese Noodle with Pork", @"Green Tea", @"Thai Shrimp Cake", @"Angry Birds Cake", @"Ham and Cheese Panini", nil];
   
    // Initialize thumbnails
    thumbnails = [NSArray arrayWithObjects:@"egg_benedict.jpg", @"mushroom_risotto.jpg", @"full_breakfast.jpg", @"hamburger.jpg", @"ham_and_egg_sandwich.jpg", @"creme_brelee.jpg", @"white_chocolate_donut.jpg", @"starbucks_coffee.jpg", @"vegetable_curry.jpg", @"instant_noodle_with_egg.jpg", @"noodle_with_bbq_pork.jpg", @"japanese_noodle_with_pork.jpg", @"green_tea.jpg", @"thai_shrimp_cake.jpg", @"angry_birds_cake.jpg", @"ham_and_cheese_panini.jpg", nil];
   
    // Initialize Preparation Time
    prepTime = [NSArray arrayWithObjects:@"30 min", @"30 min", @"20 min", @"30 min", @"10 min", @"1 hour", @"45 min", @"5 min", @"30 min", @"8 min", @"20 min", @"20 min", @"5 min", @"1.5 hour", @"4 hours", @"10 min", nil];
with:
1
2
3
4
5
6
7
8
    // Find out the path of recipes.plist
    NSString *path = [[NSBundle mainBundle] pathForResource:@"recipes" ofType:@"plist"];  

    // Load the file content and read the data into arrays
    NSDictionary *dict = [[NSDictionary alloc] initWithContentsOfFile:path];
    tableData = [dict objectForKey:@"RecipeName"];
    thumbnails = [dict objectForKey:@"Thumbnail"];
    prepTime = [dict objectForKey:@"PrepTime"];

Behind the Code Change

Line #2 – Before reading the “recipes.plist” file, you have to first retrieve the full path of the resource.
Line #5 – You have defined three keys (RecipeName, Thumbnail, PrepTime) in the property list. In the example, each key is associated with a specific array, which is the value. In iOS programming, we use the term dictionary to refer to this key-value pair association. NSDictionary class provides the necessary methods for managing the dictionary. Here, we use the “initWithContentsOfFile” method of NSDictionary class to read the key-value pairs in a property list file.
Line #6-8 – These lines of code retrieves the corresponding array with the key we defined earlier.
Once you complete the change, try to run the app again. The app is the same as before. Internally, however, the recipes are loaded from the property list.
SimpleTable App with Custom Cell Prep Time

What’s Upcoming Next?

Again, I hope you learnt a ton through this tutorial. By now you should have a better idea about property list and how you can make use of it to store small amount of data. Next up, we’ll take a look at Storyboard and Navigation Controller.
As always, if you have any problem, leave comment below (or head to our forum) to share with us.

iOS Programming Course appcoda

---> http://www.appcoda.com/ios-programming-course/

iOS Programming Course

At Appcoda, we strive to deliver the best tutorials to help anyone learn iOS programming. This free iOS programming course is target for beginners without possessing any programming experience. What you just need is a strong passion to build your own app. This course is absolutely free. Simply follow the tutorials to kick off your development journey.

iOS Programming 101

Delete a Row from UITableView

http://www.appcoda.com/model-view-controller-delete-table-row-from-uitableview/

 How To Delete a Row from UITableView

I hope you have a better understanding about Model-View-Controller. Now let’s move onto the coding part and see how we can delete a row from UITableView. To make thing simple, I’ll use the plain version of Simple Table app as an example.
If you thoroughly understand the MVC model, you probably have some ideas how to implement row deletion. There are three main things we need to do:
1. Write code to switch to edit mode for row deletion
2. Delete the corresponding table data from the model
3. Reload the table view in order to reflect the change of table data

1. Write code to switch to edit mode for row deletion

In iOS app, user normally swipes across a row to initiate the delete button. Recalled that we have adopted the UITableViewDataSource protocol, if you refer to the API doc, there is a method named tableView:commitEditingStyle:forRowAtIndexPath. When user swipes across a row, the table view will check to see if the method has been implemented. If the method is found, the table view will automatically show the “Delete” button.
Simply add the following code to your table view app and run your app:
1
2
3
4
- (void)tableView:(UITableView *)tableView commitEditingStyle:(UITableViewCellEditingStyle)editingStyle forRowAtIndexPath:(NSIndexPath *)indexPath
{

}
Even the method is empty and doesn’t perform anything, you’ll see the “Delete” button when you swipe across a row.
Swipe to Delete Table Row
Swipe to Delete a Table Row

2. Delete the corresponding table data from the model

The next thing is to add code to the method and remove the actual table data. Like other table view methods, it passes the indexPath as parameter that tells you the row number for the deletion. So you can make use of this information and remove the corresponding element from the data array.
In the original code of Simple Table App, we use NSArray to store the table data (which is the model). The problem of NSArray is it’s non-editable. That is, you can’t add/remove its content once the array is initialized. Alternatively, we’ll change the NSArray to NSMutableArray, which adds insertion and deletion operations:
1
2
3
4
5
6
7
8
9
10
11
@implementation SimpleTableViewController
{
    NSMutableArray *tableData;
}

- (void)viewDidLoad
{
    [super viewDidLoad];
    // Initialize table data
    tableData = [NSMutableArray arrayWithObjects:@"Egg Benedict", @"Mushroom Risotto", @"Full Breakfast", @"Hamburger", @"Ham and Egg Sandwich", @"Creme Brelee", @"White Chocolate Donut", @"Starbucks Coffee", @"Vegetable Curry", @"Instant Noodle with Egg", @"Noodle with BBQ Pork", @"Japanese Noodle with Pork", @"Green Tea", @"Thai Shrimp Cake", @"Angry Birds Cake", @"Ham and Cheese Panini", nil];
}
In the tableView:commitEditingStyle method, add the following code to remove the actual data from the array. Your method should look like this:
1
2
3
4
5
- (void)tableView:(UITableView *)tableView commitEditingStyle:(UITableViewCellEditingStyle)editingStyle forRowAtIndexPath:(NSIndexPath *)indexPath
{
    // Remove the row from data model
    [tableData removeObjectAtIndex:indexPath.row];
}
The NSMutableArray provides a number of operations for you to manipulate the content of an array. Here we utilize the “removeObjectAtIndex” method to remove a particular item from the array. You can try to run the app and delete a row. Oops! The app doesn’t work as expected.
It’s not a bug. The app does delete the item from the array. The reason why the deleted item still appears is the view hasn’t been refreshed to reflect the update of the data model.

3. Reload the table view

Therefore, once the underlying data is removed, we need to invoke “reloadData” method to request the table View to refresh. Here is the updated code:
1
2
3
4
5
6
7
8
- (void)tableView:(UITableView *)tableView commitEditingStyle:(UITableViewCellEditingStyle)editingStyle forRowAtIndexPath:(NSIndexPath *)indexPath
{
    // Remove the row from data model
    [tableData removeObjectAtIndex:indexPath.row];
   
    // Request table view to reload
    [tableView reloadData];
}

Test Your App and Delete a Row

Try to run your app again and swipe to delete a row. You should be able to delete it.
Simple Table App - Row Deletion
Delete a Table Row in Simple Table App
As always, leave me comment to share your experience about the tutorial.