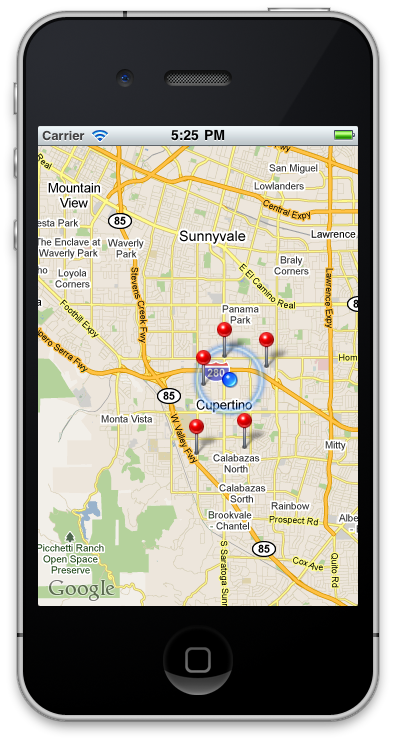
As shown in the above code we are creating annotations at random coordinates and then adding them to the map view control. The screenshot below shows the effect in action:
Như trình bày trên code trên, chúng ta đang tạo annotations với random coordinates và sau đó thêm chúng đến map view control.
If
you click on any of the annotations it will pop out a callout with custom text.
We can make the callout more attractive by adding a small house on the left or
right hand side of the callout. In the next section we are going to demonstrate
how to create custom annotations to our map.
Nếu
bạn click trên bất kì annotations nó sẽ hiện pop out a callout với text custom.
Chúng ta có thể tạo callout linh hoạt hơn bằng cách thêm một small house bên
trái hoặc bên phải của callout. Trong phần tiếp theo chúng ta sẽ nhận ra cách
tạo một custom annotations đến bản đồ.Implementing a Custom Annotation View:
Before implementing a custom annotation view we can make use of the built-in annotation views for our map. MKPinAnnotationView also allows the user to attach different controls to the annotations. The leftCalloutAccessoryView and rightCalloutAccessoryView can be used to show custom items in the annotation. The following implementation shows how a custom image can be shown in the annotation callout:
Trước
khi implement một custom annotation view chúng ta có thể sử dụng built-in
annotation views cho bản đồ của chúng ta. MKPinAnnotationView cũng cho phép
người dùng đính kèm những controls khác đến annotations. leftCalloutAccessoryView
và rightCalloutAccessoryView có thể được dùng để hiển thị
custom items trong annotation. Đoạn code sau hiển thị một custom image có thể
được hiển thị trong annotation callout:
01
|
- (MKAnnotationView
*)mapView:(MKMapView *)mv viewForAnnotation:(id
<MKAnnotation>)annotation
|
|
02
|
{
|
|
03
|
if([annotation
isKindOfClass:[MKUserLocation class]])
|
|
04
|
return nil;
|
|
05
|
||
06
|
NSString *annotationIdentifier
= @"PinViewAnnotation";
|
|
07
|
||
08
|
MKPinAnnotationView *pinView =
(MKPinAnnotationView *) [mapView
|
|
09
|
dequeueReusableAnnotationViewWithIdentifier:annotationIdentifier];
|
||
10
|
|||
11
|
||
12
|
if (!pinView)
|
|
13
|
{
|
|
14
|
pinView = [[[MKPinAnnotationView
alloc]
|
|
15
|
initWithAnnotation:annotation
|
|
16
|
reuseIdentifier:annotationIdentifier]
autorelease];
|
|
17
|
||
18
|
[pinView
setPinColor:MKPinAnnotationColorGreen];
|
|
19
|
pinView.animatesDrop = YES;
|
|
20
|
pinView.canShowCallout = YES;
|
|
21
|
||
22
|
UIImageView *houseIconView =
[[UIImageView alloc] initWithImage:[UIImage
imageNamed:@"house.png"]];
|
|
23
|
pinView.leftCalloutAccessoryView =
houseIconView;
|
|
24
|
[houseIconView
release];
|
|
25
|
}
|
|
26
|
else
|
|
27
|
{
|
|
28
|
pinView.annotation = annotation;
|
|
29
|
}
|
|
30
|
||
31
|
return pinView;
|
|
32
|
||
33
|
}
|
In order to improve the performance of the map view control we are storing the annotations type using an identifier. This means if the same annotation is used in different parts of the map then we reuse the same annotation without creating it from scratch. Run the code and click on any of the green pin and you will see a similar output:
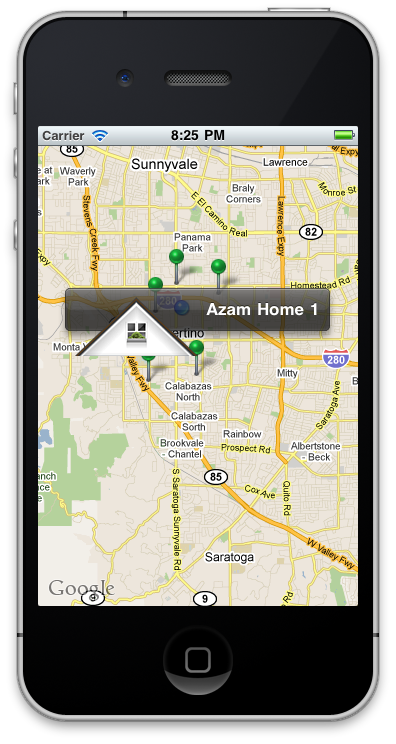
Now,
the annotations are displayed with an image but as you can see the image size
is too big for the callout. We can easily adjust that using the following code:
Bây giờ,
annotations được hiển thị với một image nhưng khi bạn có thể xem imge size thì quá lớn so với
callout.
1
|
UIImageView
*houseIconView = [[UIImageView alloc] initWithImage:[UIImage
imageNamed:@"house.png"]];
|
|
2
|
[houseIconView
setFrame:CGRectMake(0, 0, 30, 30)];
|
|
3
|
pinView.leftCalloutAccessoryView =
houseIconView;
|
|
4
|
[houseIconView
release];
|
|
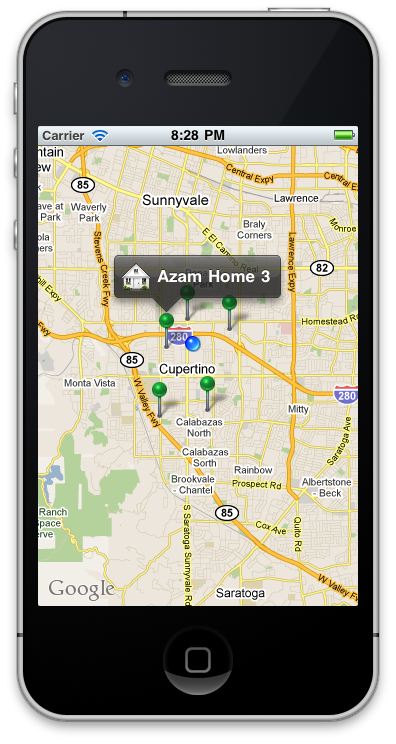
Now, run the application again and notice how the house fits perfectly inside the callout.
Although
we have customized the callout of the annotation we have not changed the
appearance of the pin. The pin can easily be changed by creating a custom
annotation view class and overriding the drawRect method. The implementation
below creates a custom annotation view class called
"LameAnnotationView" which inherits from MKAnnotationView.
Mặc dù chúng ta có
custom callout của annotation chúng ta không có sự thay đổi xuất hiện của pin.
Pin này có thể dễ dàng được thay đổi bằng cách tạo một custom annotation view
class và overriding phương thức drawRect. Implement code dưới để tạp một custom
annotation view class gọi là “LameAnnotationView” mà nó kế thức từ
MKAnnotationView.
01
|
#import
"LameAnnotationView.h"
|
|
02
|
||
03
|
@implementation
LameAnnotationView
|
|
04
|
||
05
|
-
(id)initWithAnnotation:(id <MKAnnotation>)annotation
reuseIdentifier:(NSString *)reuseIdentifier
|
|
06
|
{
|
|
07
|
self = [super
initWithAnnotation:annotation reuseIdentifier:reuseIdentifier];
|
|
08
|
if (self != nil)
|
|
09
|
{
|
|
10
|
CGRect frame = self.frame;
|
|
11
|
frame.size = CGSizeMake(60.0,
85.0);
|
|
12
|
self.frame = frame;
|
|
13
|
self.backgroundColor = [UIColor
clearColor];
|
|
14
|
self.centerOffset = CGPointMake(-5,
-5);
|
|
15
|
}
|
|
16
|
return self;
|
|
17
|
}
|
|
18
|
||
19
|
-(void)
drawRect:(CGRect)rect
|
|
20
|
{
|
|
21
|
[[UIImage
imageNamed:@"house.png"] drawInRect:CGRectMake(30, 30.0, 30.0,
30.0)];
|
|
22
|
}
|
|
23
|
||
24
|
@end
|
|
In order to use the our new LameAnnotationView we simply substitute the MKPinAnnotationView with LameAnnotationView as shown below:
Để sử dụng LameAnnotationView
mới của chúng ta, chúng ta đơn giản là thay thế MKPinAnnotationView thành
LameAnnotationView được hiển thị ở dưới:
01
|
- (MKAnnotationView
*)mapView:(MKMapView *)mv viewForAnnotation:(id
<MKAnnotation>)annotation
|
|
02
|
{
|
|
03
|
if([annotation
isKindOfClass:[MKUserLocation class]])
|
|
04
|
return nil;
|
|
05
|
||
06
|
NSString *annotationIdentifier
= @"PinViewAnnotation";
|
|
07
|
||
08
|
LameAnnotationView *pinView =
(LameAnnotationView *) [mapView
|
|
09
|
dequeueReusableAnnotationViewWithIdentifier:annotationIdentifier];
|
||
10
|
|||
11
|
||
12
|
if (!pinView)
|
|
13
|
{
|
|
14
|
pinView = [[[LameAnnotationView
alloc]
|
|
15
|
initWithAnnotation:annotation
|
|
16
|
reuseIdentifier:annotationIdentifier]
autorelease];
|
|
17
|
||
18
|
//[pinView
setPinColor:MKPinAnnotationColorGreen];
|
|
19
|
// pinView.animatesDrop = YES;
|
20
|
pinView.canShowCallout = YES;
|
21
|
||
22
|
UIImageView *houseIconView =
[[UIImageView alloc] initWithImage:[UIImage
imageNamed:@"house.png"]];
|
|
23
|
[houseIconView
setFrame:CGRectMake(0, 0, 30, 30)];
|
|
24
|
pinView.leftCalloutAccessoryView =
houseIconView;
|
|
25
|
[houseIconView
release];
|
|
26
|
| |
}
27
|
else
|
|
28
|
{
|
|
29
|
pinView.annotation = annotation;
|
|
30
|
}
|
|
31
|
||
32
|
return pinView;
|
|
33
|
||
34
|
}
|
|
Run the application and you will notice that the default pin annotations views are now replaced with our custom LameAnnotationView.
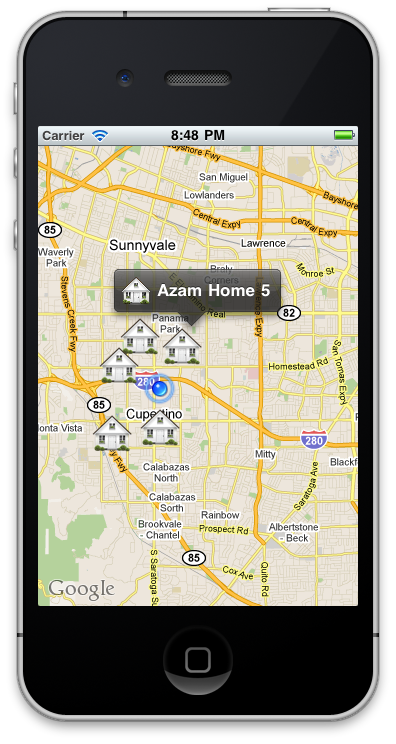
In
the process of customizing our annotation views we have lost the animation
effects. But this can easily be added again by using core animation library.
The following code shows how to add drop animations to our custom annotation
views.
Trong quá trình custom
annotation view của chúng ta, chúng ta đã làm mất effect animation. Nhưng điều
này có thể dễ dàng được thêm bằng cách sử dụng core animation library. Code sau
được hiển thị cách thêm một animation kiểu rớt xuống…
01
|
-
(void)mapView:(MKMapView *)mv didAddAnnotationViews:(NSArray *)views
|
|
02
|
{
|
|
03
|
||
04
|
// add the animation here
|
|
05
|
||
06
|
CGRect visibleRect = [mapView
annotationVisibleRect];
|
|
07
|
||
08
|
for(MKAnnotationView *view in views)
|
|
09
|
{
|
|
10
|
if([view
isKindOfClass:[LameAnnotationView class]])
|
|
11
|
{
|
|
12
|
CGRect endFrame = view.frame;
|
|
13
|
||
14
|
CGRect startFrame = endFrame;
|
|
15
|
||
16
|
startFrame.origin.y =
visibleRect.origin.y - startFrame.size.height;
|
|
17
|
view.frame = startFrame;
|
|
18
|
||
19
|
||
20
|
[UIView
beginAnimations:@"drop" context:NULL];
|
|
21
|
[UIView setAnimationDuration:2];
|
|
22
|
||
23
|
||
24
|
view.frame = endFrame;
|
|
25
|
[UIView commitAnimations];
|
|
26
|
}
|
|
27
|
}
|
|
28
|
||
29
|
||
30
|
MKAnnotationView *annotationView =
[views objectAtIndex:0];
|
|
31
|
id<MKAnnotation> mp =
[annotationView annotation];
|
|
32
|
MKCoordinateRegion region =
MKCoordinateRegionMakeWithDistance([mp coordinate] ,5000,5000);
|
|
33
|
||
34
|
[mv setRegion:region
animated:YES];
|
|
35
|
}
|
Now run the application and you will notice that the houses animates using the drop animation that we implemented in the didAddAnnotationViews method.
Bây giờ chạy ứng dụng và bạn sẽ thấy những cái
nhà có hiệu ứng drop animation mà chúng ta đã implement vào phương thức
didAddAnnotationViews.
Conclusion:
Conclusion:
In this article we lea
rned how to get started with the MapKit framework. We also demonstrated how to write custom annotations and custom annotation views which can greatly enhance the user experience.
Chúng ta đã biết cách viết custom annotations và custom
annotation views mà có thể gia tăng kinh nghiệm.