Click here...
Maps are important part of our life. We use them daily to find places and directions. The MapKit framework makes it easy for developers to implement applications which can make use of the maps in the applications. In this article we are going to introduce the MapKit framework for iOS programming.
Maps are important part of our life. We use them daily to find places and directions. The MapKit framework makes it easy for developers to implement applications which can make use of the maps in the applications. In this article we are going to introduce the MapKit framework for iOS programming.
(Bản đồ là một phần quan trọng của cuộc sống. Chúng ta sử dụng
chúng hằng ngày để tìm kiếm địa điểm và những chỉ dẫn. MapKit framework làm
việc này trở nên đơn giản cho những người lập trình để tích hợp đến những ứng
dụng. Trong bài báo này, chúng tôi sẽ giới thiệu MapKit framework của iOS).
Concepts:
(Nội dung:)
There are several concepts that we must learn first before diving into the code.
There are several concepts that we must learn first before diving into the code.
(Có một vài nội dung mà chúng ta phải học đầu tiên trước khi xem những đoạn code).
MKMapView: MKMapView is a UI control which is used to display map in iOS devices.
(MKMapView: MKMapView
là một
UI control mà nó được sử dụng để hiển thị bản đồ trên những thiết bị iOS).
Annotation: Annotations is information related to a particular place on the map. These include grocery stores, gas stations, malls or even custom information inserted by the user.
Annotation: Annotations is information related to a particular place on the map. These include grocery stores, gas stations, malls or even custom information inserted by the user.
(Annotation:
Annotations là thông tin liên quan đến một địa điểm cụ thể nào đó trên map. Những
cái này bao gồm: cửa hàng tạp hóa, sân
ga, mall hay bất kì thông tin custom nào được insert bởi người dùng.)
AnnotationView: The visual appearance of Annotations are defined using the MKAnnotationView class. By default the annotations are displayed using the pin annotation view.
AnnotationView: The visual appearance of Annotations are defined using the MKAnnotationView class. By default the annotations are displayed using the pin annotation view.
(AnnotationView: là một thể hiện của
Annotations, mà nó được định nghĩa bằng cách sử dụng MKAnnotationView class. Mặc
định thì những annotations được hiển thị bằng cách sử dụng view pin annotation.)
Referencing the Frameworks:
Referencing the Frameworks:
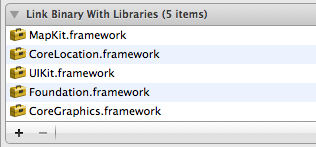
For this application we will be using the
MapKit.framework and CoreLocation.framework. Add both the frameworks to your project using the Build Phases tab as shown below:
Displaying
Map Using MKMapView Control:
After adding the reference to the MapKit.framework and CoreLocation.framework libraries we are ready to create our MapKit application. The first step in using the MapKit framework is to display the map on the iOS device. This can easily be performed by using the MKMapView control. Let's drag and drop the MapView control on the user interface with the help of the interface builder.
After adding the reference to the MapKit.framework and CoreLocation.framework libraries we are ready to create our MapKit application. The first step in using the MapKit framework is to display the map on the iOS device. This can easily be performed by using the MKMapView control. Let's drag and drop the MapView control on the user interface with the help of the interface builder.
(Sauk hi thêm những
framework chúng ta đã sẵn sàng để tạo ứng dụng MapKit của chúng ta. Điều đầu
tiên là sử dụng framework MapKit để hiển thị bản đồ trên thiết bị di động iOS.
Điều này thì dễ dàng để thực hiện bằng các sử dụng MKMapView control. Chúng ta
hãy kéo và thả MapView control trên user interface với sự giúp đỡ của interface
builder).
Also, make sure to link the MKMapView control to the controller. The MapKitDemoAppDelegate.h implementation is shown below:
Also, make sure to link the MKMapView control to the controller. The MapKitDemoAppDelegate.h implementation is shown below:
(Cũng như
thể, hãy chắc chắc rằng là liên kết đến MKMapView control đến controller.
MapKitDemoAppDelegate.h :)
01
|
#import
<UIKit/UIKit.h>
|
|
02
|
#import
<MapKit/MapKit.h>
|
|
03
|
#import
<CoreLocation/CoreLocation.h>
|
|
04
|
#import
"MapPoint.h"
|
|
05
|
#import
"LameAnnotationView.h"
|
|
06
|
||
07
|
@interface MapKitDemoAppDelegate
: NSObject
<UIApplicationDelegate,CLLocationManagerDelegate,MKMapViewDelegate,UITextFieldDelegate>
{
|
||
08
|
|||
09
|
CLLocationManager
*locationManager;
|
|
10
|
IBOutlet MKMapView *mapView;
|
|
11
|
||
12
|
}
|
|
13
|
||
14
|
@property
(nonatomic, retain) IBOutlet UIWindow *window;
|
|
15
|
@property
(nonatomic,retain) IBOutlet MKMapView *mapView;
|
|
16
|
||
17
|
@end
|
Run the application and you will see the map of the world as shown in the following screenshot:
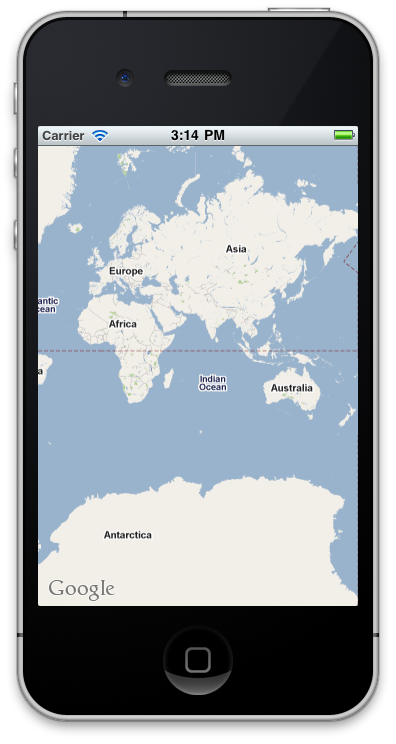
Pretty
cool right!
We can even focus on the current position of the user using the following code:
We can even focus on the current position of the user using the following code:
(Chúng ta thậm chí có thể focus vị
trí hiện tại của người dùng bằng cách sử dụng code sau:)
01
|
-
(BOOL)application:(UIApplication *)application
didFinishLaunchingWithOptions:(NSDictionary *)launchOptions
|
|
02
|
{
|
|
03
|
self.mapView.delegate =
self;
|
|
04
|
||
05
|
locationManager =
[[CLLocationManager alloc] init];
|
|
06
|
[locationManager
setDelegate:self];
|
|
07
|
||
08
|
[locationManager
setDistanceFilter:kCLDistanceFilterNone];
|
|
09
|
[locationManager
setDesiredAccuracy:kCLLocationAccuracyBest];
|
|
10
|
||
11
|
[self.mapView
setShowsUserLocation:YES];
|
|
12
|
||
13
|
||
14
|
// Override point for
customization after application launch.
|
|
15
|
[self.window makeKeyAndVisible];
|
|
16
|
return YES;
|
|
17
|
}
|
The CLLocationManager class is responsible for fetching information about the user's location. The following line enables the mapView to show the user's current location.
Lớp CLLocationManager có
nhiệm
vụ fetch thông tin về location của người dùng. Dòng code sau cho phép map View hiển thị location hiện tại của người
dùng.
1
|
[self.mapView
setShowsUserLocation:YES];
|
The following screenshot shows the effect:
The following screenshot shows the effect:
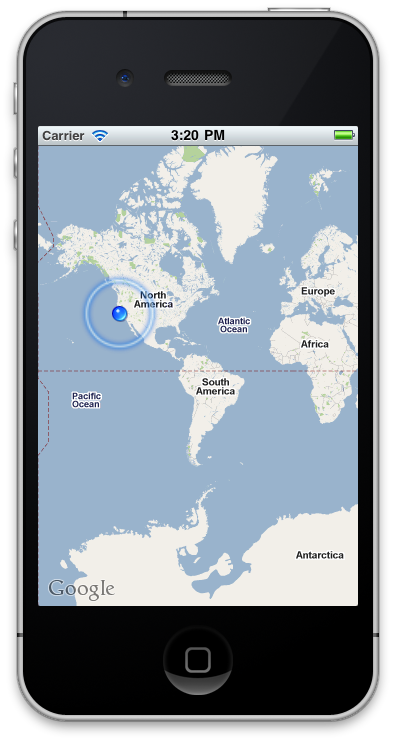
Although
the user's location is focused in the map but currently is shows an eagle view
of the location. We need to zoom into the location to get more details. This
can be easily accomplished by using the following implementation:
Mặc dù location của người dùng được focus trong bản
đồ nhưng hiện tại nó được show một eagle view của location. Chúng ta cần zoom
location này để xem thông tin chi tiết. Xem code sau: )
1
|
-
(void)mapView:(MKMapView *)mv didAddAnnotationViews:(NSArray *)views
|
|
2
|
{
|
|
3
|
MKAnnotationView *annotationView =
[views objectAtIndex:0];
|
|
4
|
id<MKAnnotation> mp =
[annotationView annotation];
|
|
5
|
MKCoordinateRegion region =
MKCoordinateRegionMakeWithDistance([mp coordinate] ,250,250);
|
|
6
|
||
7
|
[mv setRegion:region
animated:YES];
|
|
8
|
}
|
|
didAddAnnotationViews is one of the delegate methods of the MKMapViewDelegate which will send the events to the current controller as setup inside the didFinishLaunchingWithOptions method:
didAddAnnotationViews là một trong nhưng method
delegate của MKMapViewDelegate mà sẽ gửi những event đến controller hiện tại
như việc thiết lập bên trong phương thức didFinishLaunchingWithOptions: )
1
|
self.mapView.delegate =
self;
|
Since, there is currently only one annotation view added to the map we can access it using the [views objectAtIndex:0] method. MKCoordinateRegion creates a customized region on the map which can be zoomed in or out. The following screenshot shows the map zoomed in on the user's location.
Lúc này, chỉ có một annotation view được thêm đến bản đồ, chúng ta có thể truy cập nó bằng cách sử dụng [views objectAtindex:0]. MKCoordinateRegion tạo một vùng custom trên bản đồ mà có thể phóng to, thu nhỏ. Ảnh sau hiển thị bản đồ được zoom in trên location của người dùng.
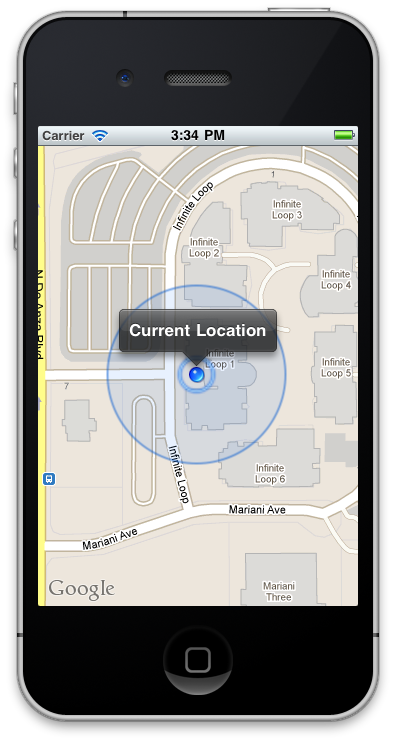
One
thing to notice is that the simulator shows the user's current location
in California where the Apple's headquarter is located. In order to get the
correct user location you must run the application on the device. In the next
section we are going to add annotations to our map.
(Để lấy đúng location
hiện tại bạn phải chạy ứng dụng trên thiết bị. Trong phần tiếp theo chúng ta sẽ
thêm annotations đến bản đồ của chúng ta).
Adding Annotations to the Map:
Adding Annotations to the Map:
We are going to create our own custom annotation by inheriting from the MKAnnotation class as shown in the implementation below:
Chúng ta sẽ tạo một annotation
custom bằng cách kế thừa từ lớp MKAnnotation:
01
|
#import
<Foundation/Foundation.h>
|
|
02
|
#import
<CoreLocation/CoreLocation.h>
|
|
03
|
#import
<MapKit/MapKit.h>
|
|
04
|
||
05
|
@interface MapPoint
: NSObject<MKAnnotation> {
|
|
06
|
||
07
|
NSString *title;
|
|
08
|
NSString *subTitle;
|
|
09
|
CLLocationCoordinate2D coordinate;
|
|
10
|
||
11
|
}
|
|
12
|
||
13
|
@property
(nonatomic,readonly) CLLocationCoordinate2D coordinate;
|
|
14
|
@property
(nonatomic,copy) NSString *title;
|
|
15
|
@property
(nonatomic,copy) NSString *subTitle;
|
|
16
|
||
17
|
-(id)
initWithCoordinate:(CLLocationCoordinate2D) c title:(NSString *) t
subTitle:(NSString *) st;
|
|
18
|
||
19
|
@end
|
The didUpdateUserLocation method of the MKMapViewDelegate is called when a new location update is received by the map view. Inside this method we are going to create custom annotations and add them to the map.
Phương
thức didUpdateUsreLocation của MKMapViewDelegate được gọi khi một location mới
cập nhật được nhận bởi map view. Bên trong phương thức này chúng ta sẽ tạo
những annotation custom và thêm chúng đến bản đồ.
01
|
-
(void)mapView:(MKMapView *)mv didUpdateUserLocation:(MKUserLocation
*)userLocation
|
|
02
|
{
|
|
03
|
CLLocationCoordinate2D
userCoordinate = userLocation.location.coordinate;
|
|
04
|
||
05
|
for(int i
= 1; i<=5;i++)
|
|
06
|
{
|
|
07
|
CGFloat latDelta =
rand()*.035/RAND_MAX -.02;
|
|
08
|
CGFloat longDelta =
rand()*.03/RAND_MAX -.015;
|
|
09
|
||
10
|
CLLocationCoordinate2D newCoord =
{ userCoordinate.latitude + latDelta, userCoordinate.longitude + longDelta };
|
|
11
|
MapPoint *mp = [[MapPoint alloc]
initWithCoordinate:newCoord title:[NSString stringWithFormat:@"Azam Home
%d",i] subTitle:@"Home Sweet Home"];
|
|
12
|
[mv addAnnotation:mp];
|
|
13
|
[mp release];
|
|
14
|
||
15
|
}
|
|
16
|
}
|
|
As shown in the above code we are creating annotations at random coordinates and then adding them to the map view control. The screenshot below shows the effect in action:
Nguồn: http://www.highoncoding.com/Articles/804_Introduction_to_MapKit_Framework_for_iPhone_Development.aspx
ReplyDelete